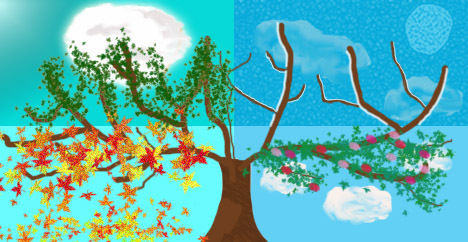
Portfolio
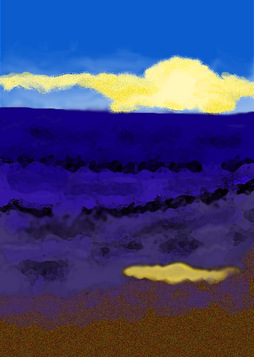
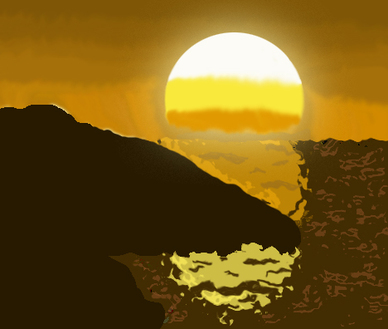
1. Make a new layer. Go to the bottom left hand corner to pick the color. You should pick a dark brown. (this will be the sand but its dark outside and the sun is setting) On the left hand side, near the bottom, draw a diagonal line to the right hand side going up at a small slant. Then use the paint bucket to fill the area.
2. Make a new layer and pick a purplish blue. This will be the ocean. Color it purplish blue from the top of the sand up to ¾ of the screen.
3. On a new layer, pick a pretty shade of blue, more dark than light. This will be the sky. Color a sliver on top. Now make the opacity 75% and do another sliver, then 44% and another sliver that goes to the top of the ocean.
4. Pick a dark navy blue color and color the top fourth of the ocean that color. The ocean should have three layers of blue/purple colors. We will blend these and make them like waves later.
5. Go to filter, distort, and then glass. Select the burn too, and draw what little waves on each of the three colors of the ocean. Repeat with the sponge tool. Filter, distort, glass again.
6. Go to the eyedropper tool and click on one color of the ocean. Make the opacity lower and use the brush to blend the colors. Do this with all the ocean colors.
7. Go to the smudge tool and smudge the darker parts of the sky into the lighter parts. Smudge the ocean just a tad into the sky. Then use the blur tool to blur everything from the top of the ocean up to the sky.
8. Pick a shade of yellow/orange and make a sun above the ocean in the sky and put the same color at lighter opacities radiating out of the sun into the sides of the page.
9. Make another smaller sun with less opacity around the shore so it looks like a reflection. Go to filter, artistic, and fresco.
10. Use the quick selection to select the top sun and press ctrl j to copy the layer. Then go to layer styles, outer glow white, size 100%, opacity 75%. Inner glow white same percentages. You can blur and smudge more if you want.
11. Go to layer styles, color overlay, and make it a medium shade of blue, click check on satin. Blur the sky horizontally so it has a small cloud effect.
1. Make a new layer and pick a dark shade of teal. From the upper right hand corner make a diagonal down to just an inch under the left hand corner. Fill it in using the paint bucket or a thick brush.
2. New layer, pick a lighter tone of the same color and do the same thing. New layer, repeat again with a lighter tone.
3. New layer, view, show, grid. Use a lighter tone of the same color and do the same thing except stop at half the page. Use the grid to help.
4. Use the smudge tool to blend the colors a bit. Go to sketch, filter, and bass relief. Do this for each layer.
5. With the brush, pick a whitish color and make a big cloud on the left hand side on the sky. Pick a slightly darker tone of the white, like grayish almost and put small strokes of that over the cloud. Use the smudge tool to mix it a little with the white. Smudge the edges of the clouds to make them look more real.
6. Merge down all the sky layers until they have become one. New layer. Use white to outline all the dark patches in the sky. After that, put the same grayish tone on the whites and smudge to give the cloud effects.
7. New layer. On the bottom of the cloud but still on the sky, pick a medium shade of green and paint that sliver. While the latter is the foreground color, for the background color pick a darker shade of green. Now go to filter, noise, add noise. This will be the grass.
8. New layer. Pick a dark shade of brown and on the grass going up towards the middle of the cloud; make a tree trunk with branches. Make the background and fore ground colors a shade of orange and a shade of red. These will be the leaves. Go the brushes and pick the leaf brush. On a new layer. Use the brush to put several leaves on the branches.
9. Make a new layer and a new tree trunk with branches on the top right hand side. Go back to the layer with the leaves and select the leaves and press ctrl c to copy them. Go to a new layer and ctrl v to paste them on the new tree.
10. Merge down all the layers. Copy this new layer that and paste it. Go to edit, transform, vertical so that the duplicated image is upside down. Make sure the two images meet in the middle of the page.
11. Use the smudge tool the make the part in between the two images a little blurry and undefined.
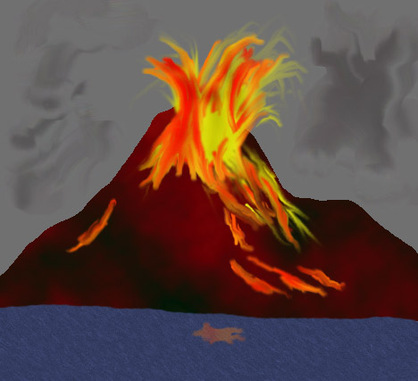
1. Make a new layer and make the background color gray. Open a new layer and make a brown montain/hill but leave a rectangle space at the bottom.
2. Make a new layer, pick a bluish gray color and fill the bottom rectangle. On a new layer, click the elliptical marquee tool and make a circle just below the mountain peak and fill it with white.
3. Click the smudge tool and make arcs projecting from the top of the circle and to the right, down the mountain. (It will look like lava).
4. Go to image, adjustments, gradient map, and click on the purple, red, yellow square. Then go to image, adjustments, hue/saturation, check colorize. Move the hue around until it’s yellow, Make the saturation a little bright. Then click ok.
5. Apply various orange and dark orange shades and smudge it to make it look more like lava. Go to the mountain layer and click filter, render, differentiate clouds.
6. Go to water layer and click filter, distort, diffuse glow.
7. In the sky layer, use the burn tool to make some parts dark and then use the smudge tool to make it have a cloudy, smoky effect. Use the burn tool again on the lava layer.
8. With a low opacity of orange, paint a very small reflection of the lava.
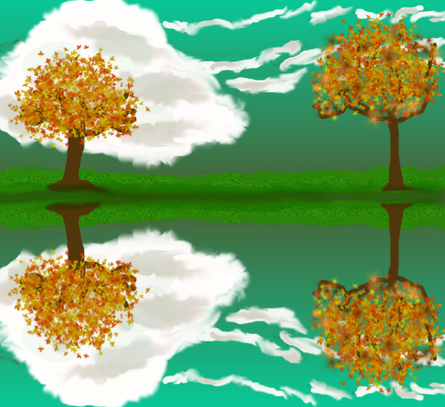
1. Make a new layer. Pick a brown color and make a tree trunk in the middle and starting from the bottom of the page going up to around the middle.
2. View, show, grid, for help. New layer. On top left hand side quadrant, turquoise blue background color. New layer. On top right hand quadrant, baby blue background color. New layer. Do the other two quadrants other shades of blue.
3. Make a new layer in which, you just put branches on the tree. These branches should be in all four quadrants. In the top right hand quadrant, make a moon by using a low opacities of light blue. Filter, sketch, reticulation. With light blue shades and low opacity make a few lines next to each other and smudge them together so it looks like a cloud. You can do two.
4. On the branches in the winter quadrant, pick a smaller brush and outline one side of each branch with white. On the bottom left hand quadrant (autumn), new layer, use the leaf brush to but red, yellow, and orange leaves. Filter, texture, and grain. Put some leaves on the bottom and in the middle to give the effect that they’re falling.
5. New layer, make clouds with bigger opacity white and smudge too. Make a new layer. Pick a green color and using the brush tool, make leaves on the branches. Go online and find a picture of a flower. Copy it and paste it on a new layer on Photoshop.
6. Use the selection tool to select the flower, edit, define brush preset. On a new layer, and with shades of pink, red, and light pink, put small flowers on the tree in the spring quadrant.
7. On the summer quadrant, top right hand, go to filter, artistic, plastic wrap. Then go to edit, transform, and rotate 180 degrees.
8. In the summer quadrant, with a white colored brush, make a cloud, Pick grayish tone and put a few scattered lines in the cloud. Then smudge them all to make it look more cloud-like. Layer, layer styles, a small outer glow.
9. With the leaf brush, and a dark green color, put leaves on the tree in the summer quadrant.
10. On the tree trunk layer, filter, artistic, smudge stick.
1. Make a new layer. With the rectangular marquee tool, select the bottom half and fill it in with a dark brown color.
2. Make a new layer and for the top half. Start with an orange color, and color a rectangular segment starting from where the muddy brown is.
3. Make rectangular segments all the way to the top of the page in which the color gets darker and darker and surpasses the muddy brown color. Filter, artistic, underpainting. Use the smudge tool and blur to blend the colors.
4. New layer. With an even dark brown color, make a mountain/hill, protruding from the left side of the layer. On a new layer, use the elliptical marquee tool to make a circle in the middle.
5. Fill in the top third, white, middle, yellow, and bottom third orange. Blend the colors together with the smudge tool and add an outer glow. Blur the sun where the colors blend.
6. With low opacity orange and yellow, make a reflection on the ocean. Filter, distort, and ripple. With the dark brown color of the ocean, and the mud color sky, draw little scattered lines in the orang in yellows to make them look like waves in the reflection. Filter, distort, and ripple. With the quick selection tool, select the ocean but not the yellow and orange reflections and copy the layer.
7. With a shade of brown that is lighter than that of the ocean, scatter squiggly lines horizontally on the ocean. Then filter, distort, and ocean ripple for wave effect.
1. Make a new layer. Fill the background with a whitish, pink tone, the color of sand. Make a new layer, and make the top half a teal shade of blue. This will be the ocean.
2. Make a new layer, use a 47% opacity of the same blue and make a smaller segment under the normal blue. Outline that with a white border line.
3. Use the sponge tool to lighten the color of the ocean blue on the top segment and the middle segment. Use the smudge tool to blend where all the colors meet. On sand layer, noise, add noise. On ocean layer, filter, distort, ocean ripple.
4. On the white shorelines, draw thin white lines coming from the borderlines and going into the ocean. Smudge those and blur them. Repeat this step three times: white border lines, white lines coming out from those, and low opacity blue layers.
5. Go to windows, animation. The layers that are currently unhidden will show up. Click new layer on the animation toolbar and go to one of your white borderline layers and move it either by hiding or making it lower and higher.
6. Make a new layer, and change the white borderlines. Do this several times. Right next to the new layer button is a series of little balls, click that and click ok. Do that again.
7. Next to the two arrows pointing to the left (on the animation toolbar), click that and click forever. That way the gif will never stop.
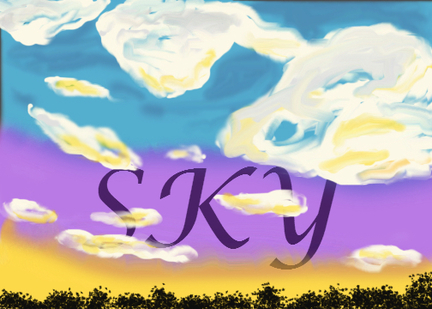
1. Make a new layer and fill it and fill the top three quarters with a medium shade of blue, light opacity at a curve. New layer. Fill a slither under the blue a medium shade of purple, light opacity. Fill the last small part of the page a yellow/orange shade, low opacity.
2. Use the smudge tool to smudge where the different colors meet and then use the blur tool. Make a new layer. Use a small black leaf paint brush and make small bushes on the bottom. They will look like the tops of trees.
3. Make a new layer and make several clouds with a normal white brush tool. Instead of coloring the cloud all in white, leave some spaces between.
4. In these spaces, use the smudge tool to make the cloud come together, allowing some of the background sky to see through. Do this throughout the sky. Be creative and make all kinds of clouds.
5. Now to make it look like there are shadows and sunlight on the clouds, put different shades of yellow and grays and smudge and blur on the various clouds. Put an orange outer glow on the orange part of the sky.
6. Merge all the layers together and then copy the layer, ctrl j. Make a new layer. Grab the copied layer and drag it on top of the new layer. Put a text box in the upper left hand corner and type “sky” in all caps.
7. Ctrl t and use the arrow at the bottom right hand corner to make the world a little bigger. Then click the check on the top right. Grab the copied layer and drag it on top of the text layer.
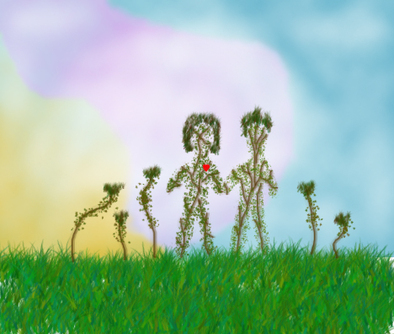
1. Make a new layer. With the paint brush tool, choose a medium shade of blue and a 75% opacityto color the right side of the screen. Use different opacities and shades of blue. Make a newlayer and a part of the left side a low opacity shade of orange.
2. In the middle, fill it with low opacity shades of pink/purple. On each layer, use the quick selection tool to select whatever is on that layer and go to filter, render, clouds.
3. Merge down each layer so that the sky is all in one layer. Use the dodge tool, to make it whitish and to add depth to the sky.
4. Make a new layer and on the bottom portion, use the grass brush tool, foreground and background colors shades of green, and fill with grass.
5. Use the pen tool to make a person coming out from the grass. With a brown brush tool, draw twigs/branches in the path.
6. hen use the leaf paint brush, camo green, to fill in the person but not totally. The sky should show in the background. Then use the grass paint brush, green to make sort of an afro for the hair.
7. Move the person you just made a little to the right. On the same path, make another person, and for the hair make it go down to the shoulders to show it’s a girl. Move her around to look like the two are holding hands.
8. On a new layer, use a brown brush tool to make twigs coming up from the ground. Put green leaves on the top halves of these twigs. And to top it off, put some grass on the tops.
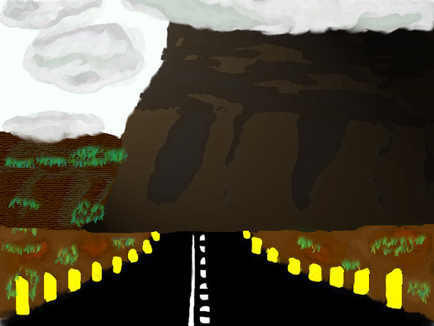
1. Make a new layer. From the bottom corner and at a slant meeting at about ¼ the page, with the black brush tool, draw a road. On a new layer fill the remaining bottom 4th of the page with brown.
2. On a new layer, use the white brush to make a line in the middle of the road and alongside small rectangles getting smaller towards where the road ends
3. Make a new layer and along each side of the road, put up little yellow pillars that get smaller towards the end of the road. Use the burn and sponge tool on the mud and then smudge.
4. On the mud/dirt/brown layer, go to filter, artistic, watercolors. Smudge the road and mud together where the yellow pillars meet. Foreground and background colors light and dark green. Small grass brush tool and make patches of grass and small bushes on the dirt.
5. Make a new layer, and with a grayish brown paint brush draw a big mountain on the right hand side. On top put squiggly dark gray lines and some on the bottom of the hill. Blur the lines a little. Go to filter, render, lighting effects and move the oval so that the light is coming from the top left hand corner. Then go to filter, artistic, palette knife.
6. Make a new layer and another mountain but make this one smaller and on the left side. Filter, artistic, underpainting. Then put some grass on the mountain.
7. On a new layer, make the sky a very light gray. Make clouds: one on top of the big hill and one on top of the little one and small ones in the sky. Put gray and white and use the smudge tool. Then filter, artistic, fresco.
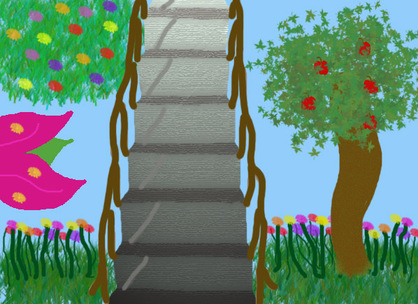
1. Open a new layer and with dark and light gray make stairs form the bottom middle to the top and it should be getting smaller towards the top at a slant. Filter, render, light effects and move the oval so that the light is on the top of the stairs.
2. On a new layer make a brown handlebar for the stairs. With a low opacity gray, put a line on each stair to represent the shadow of the handle bar.
3. On a new layer, make grass by using green foreground and background colors and using the grass brush tool. On a new layer, with a green brush tool, draw stems coming up from the grass.
4. Go on the internet and find a picture of a flower and save it and open it on Photoshop. Use the quick selection tool to select the flower and ctrl j to cop the layer. Then go to edit, define brush preset.
5. Now on your actual picture. On a new layer make several colored flowers on top of the stems. (orange, red, pink, yellow, and orange. On a new layer, make a bush with green grass on the top left hand corner. Put multicolored flowers on those.
6. On a new layer make a tree by using the brown brush tool and put green leaves on top and make red apples with brown stems. On the tree trunk, filter and diffuse glow.
7. Finally, on the left hand side, make a green leaf with two hot pink petals and top it off with two yellow flowers.
