1. Make the background color a medium shade of blue (not dark or light).
2. On the internet, find pictures of clouds, open them up on photoshop, and save them as brush presets. Using the cloud brushes, put three stormy (dark gray) clouds, each one with its own layer.
4. On the internet, find a picture of a raindrop, open that on photoshop and save it as a brush preset. Using the raindrop brush, put several light blue raindrops, all on the same layer.
5. On the internet, find a picture of a sun, open that on photoshop and save it as a brush preset. Using the sun brush, put a tiny sun (yellow) in the top lefthand corner. Make several suns increasing in size, each with its own layer.
6. Click on the custom shape tool. On the top of the page, click the shape arrow and scroll until you find a lightning picture. Put three, all of them yellow.
7. Click on window, animation. The first slide should be rain and three clouds.
8. Make a new slide, click the rain layer, click the move tool, and drag the raindrops down a little. Click each cloud layer individually, and the move tool to move each cloud to the right a little. Show the layer of the smallest sun.
9. As you make each new slide, move the rain down a little until it's gone and hide that layer, move the three clouds to the right until they're gone and hide those layers, and unhide the layer for the bigger sun.
10. Keep doing this until the raindrops and clouds are gone and you only have one big sun.
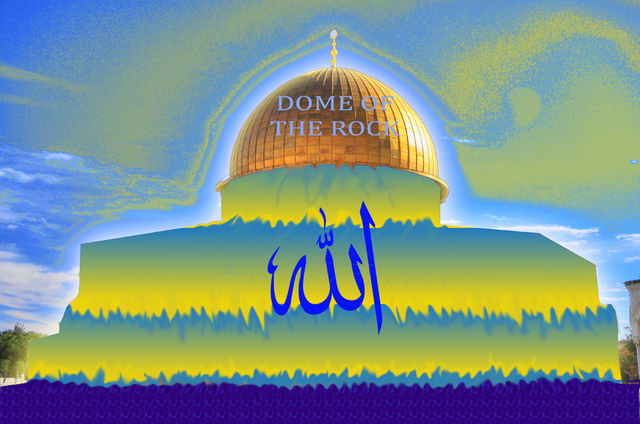
1. On the internet , find a picture of Dome of the Rock. It's a mosque in Jerusalem.
2. On the left hand toolbar, click the pen tool and create a path around the building but excluding the golden dome on top.
3. Open a new layer in which the foreground color is turquoise blue and the background color is yellow. Click filter, sketch, and plaster. Then go to the top and click edit, define brush pattern, ok.
4. Go back to the layer with the building and click on the pen tool again. Right click on the path and click fill path. On the arrow next to use, click pattern and click o the pattern you just created.
5. On the lefthand toolbar, click on the eydrop, and then click on the sky. Click select, color range, ok. Then on the bottom left corner where the foreground and backround colors are, make sure on is turquoise, and the other is a goldish yellow. Then clidk, filter, sketch, halftone patterns and make the pattern type dots.
6. Create another path with the pen tool from the bottom of the building to the ground. It should be a rectangle. Right click on this rectangle, fill path, on the narrow next to use, click pattern and pick a dark/navy blue pattern.
7. On the internet search Allah, and find an arab calligraphy of your choice. Open this up on a new layer. Click edit, define brush preset, ok. On your original layer, go to brushes and find the brush you have just made. Make sure it's a navy blue color and put the brush on the building.
8. Lastly, Make a text box over the dome. It should be a sky blue color. Type Dome of the Rock. Click check. ctrl t and click the arrows on the corners to make it bigger and then click check. Tadaa!
