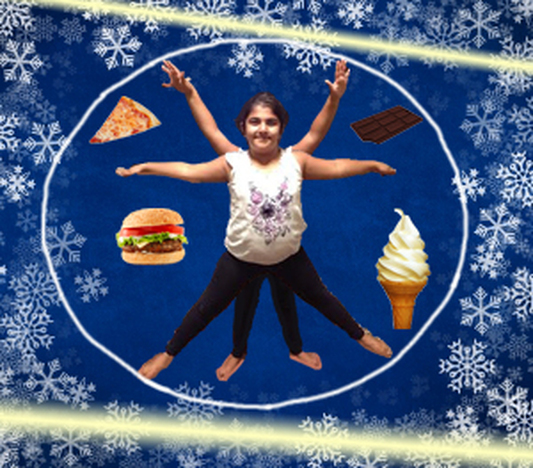
1. On google images, search snow background and this should show up. Save the image and open it up on photoshop. I took two pictures of my sister in those two poses.
2. I emailed the pictures to myself, saved them, and opened them on photoshop. I used the quick selection tool to select only her body and not the background and copied the layers. I quick selectioned both images of her, copied and pasted them on new layers on the snow document.
3. Use the move tool to make it seem like both arms and legs are coming out from one body. From the internet find a picture of a chocolate bar and copy it and paste it onto a new layer.
4. Ctrl t to make it small and then copy it and past it onto the snow layer in between two of the arms. Go online and find a picture of a burger, ice cream, and pizza and repeat these steps. Put each item of food in a new space between her limbs.
5. Use the shape tool, specifically the circle and put it around her body. Try to make the toes and the fingers touch the tip of the circle. Then use a white brush tool to trace the circle as best as you can.
6. Now merge all the layers down by right clicking on each layer and selecting merge down. Ctrl j to copy layer. Click on gradient tool(under paint tool). On the top click the reflected gradient (4th). Background and foreground colors are black and white. Click q. (quick mask) Make a random line by clicking on the image. do one on top of her and one on the bottom.
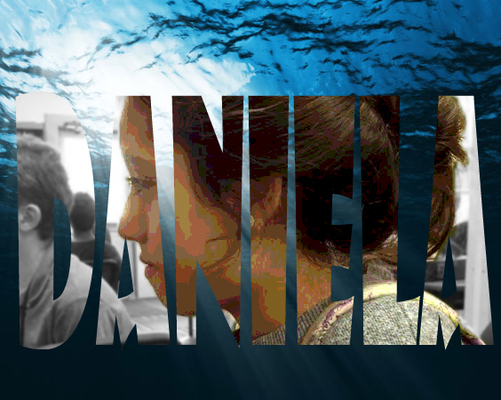
1. Made a new layer and took a profile picture of Daniela. I emailed it to myself and uploaded it onto photoshop. I quick selectioned her, went to images, adjustments, and posterize to about 15 colors. and pressed ctrl j.
2. Then I quick selectioned everything but her and pressed ctrl j. I clicked image, adjustments, black & white.
3. I made a new layer and clicked on text box, making sure the color scheme was on a camoflauge green. I wrote Daniela in caps and dragged the right bottom corner up and pressed check. ctrl T and dragged the right bottom corner down check.
4. Click the move tool to drag the words over her face.
5. Merge all the face layers together. Move the face layer above the words layer and create a clipping mask on the face layer. Look up a picture of the ocean and save it. Open it up on a new layer. Quick selection the ocean and ctrl c and ctrl v on the background layer.
6. Now use the crop tool to get rid of the excess layer. Use the move tool to put the clipping mask over the ocean around the middle.
